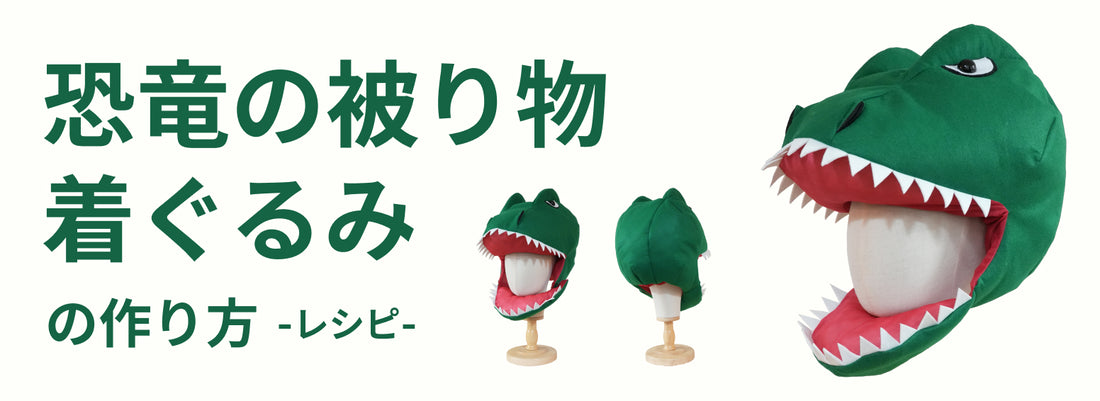

Download this sewing pattern here
Prepare the pattern
Once you’ve decided on a size, buy the pattern and download it from the link provided after purchase.
The available sizes differ from product to product.


Print the downloaded file at “actual size” on the indicated print size (A4 or A3).
It includes the pieces for both the snake and the dinosaur.
Please note that we cannot offer refunds for orders placed in the wrong print size.


Cut out and assemble the pattern
Cut out the pattern along the cutting lines.


Overlap the tabs with matching numbers and tape them together.


If a tab overlaps a cutting line, tape it together first and then cut away the rest.


Cut out the outer fabric, lining, and dinosaur pieces you need for the Dinosaur Plush Hat.


Align points I, A, and H on Outer B and the dinosaur eye (upper) and tape them together.


Snip along the cut-out line on the dinosaur eye (upper).


Cut out the fabric
Fold the left edge of the fabric in half, place Outer B against the fold, and cut it out following the pattern.
Also cut out the snipped parts.
Just like Outer B, cut out any pattern marked with the “fold”※ symbol the same way.


- 【 fold (on the fold) 】
- When this symbol appears, it means the pattern is only half of the piece.
Using the edge marked “fold” as the center line, trace the pattern to the left and right to complete one full piece.
Outer A is marked “×2 (one left, one right),” so cut out a total of 2 mirror-image pieces.
※Where the steps are the same as the snake, we reuse the snake photos. Only the fabric color differs; the work itself is identical, so please bear with us.


Stack two pieces of felt slightly larger than the teeth and glue them together.
Once the glue is dry, lay the pattern on top and cut them out.


Where the pattern says “×1,” cut just one piece; where it says “×2,” cut two of the same piece.
※Where it says “×2 (one left, one right),” cut out a total of 2 mirror-image pieces.


Mark the pattern
Use an awl or similar to make holes in the pattern. The holes mainly go at the “corners” and “apexes.”
For Outer A, for example, make holes at the red dots.
※Where the steps are the same as the snake, we reuse the snake photos. Only the fabric color differs; the work itself is identical.


Lay the pattern over the piece you cut in step 3, and transfer the marks by inserting your pen tip into the holes you just made.
Of course, if you don’t mind the effort, you can trace the whole pattern.


To transfer the hook-and-loop fastener placement, poke through the pattern with something pointed to make a small hole as a guide mark.
The pieces to mark are the side of Outer A “that comes to the left when worn” and Lining C.


Sew
Cut a 25 mm-wide hook-and-loop fastener (Velcro) to a length of 4 cm.
We recommend rounding off the corners so they don’t feel scratchy.
※Where the steps are the same as the snake, we reuse the snake photos. Only the fabric color differs; the work itself is identical.


Sew the hook-and-loop fastener onto the “right side” of Outer A, where you marked it in step 4-3.


As before, cut a 25 mm-wide hook-and-loop fastener to a length of 4 cm and sew it onto the “right side” of Lining C (the chin).

Fold Outer A at A–B with right sides together※ and sew the dart※.
Basically every piece has a 1 cm seam allowance, so you can just sew 1 cm in from the fabric edge.


- 【 right sides together 】
- Layering the right sides of two pieces of fabric so they face each other.
- 【 dart 】
- A triangular tuck stitched into the fabric to give it a three-dimensional shape.
In the same way, fold Outer A at C–D with right sides together and sew the dart. Once done, sew the darts on the other Outer A piece as well.


Fold Outer B at E–F with right sides together and sew the dart.


Fold at the snip, and sew 5 mm inside the snip.
Using the stitching line (the dotted line) on the dinosaur eye (upper) as a guide, sew so as to close the opening.
Place Outer B right side up and lay the dinosaur eye (lower) on top.
Align notches H, h, and i, baste them, and sew H–h–i together.
Once sewn, turn the eye part right side out.


Stack the two dinosaur nose pieces (black and green) and sew one edge together.
Once sewn, trim the seam allowance short, snip into the middle as well, and turn it right side out.


Fold the nose you just sewed in half and sew 5 mm from the edge.


Baste the nose you just sewed at points j and k on Outer A, and sew 5 mm from the edge.


Layer Outer A and B with right sides together so the triangular parts (notches) line up, and sew from G to H.
Sew so that the nose is sandwiched between Outer A and B.


Fold the H-section seam allowance inward and sew H–h–i together.
Next, fold the i-section seam allowance outward and sew i–I–J together.


Press the raised part of the eye (H–h–i) inward with your finger to push it in.
Sew the lining onto the eye part you just pushed in. Baste the lining so it covers the recessed part.
Sew 5 mm from the edge of the lining.
This lining is sewn on to keep the stuffing from leaking out when you fill the eye.


Turn the outer fabric right side out and baste the dinosaur tooth (upper).
Layer with right sides together so the triangular parts (notches) line up.
Sew 5 mm from the edge of the teeth you just basted.


Fold Outer C at K–L with right sides together and sew the dart.


Place Outer C right side up and baste the dinosaur tooth (lower).
Layer with right sides together so the triangular parts (notches) line up, and sew 5 mm from the edge of the teeth.


Sew around Outer C and Lining C.
However, leave the section between N and O open.
Trim the corners at M and Q diagonally, then turn the whole thing right side out through the N–O opening.


Add stuffing through the N–O opening.
Once stuffed, sew 5 mm from the N–O edge to close the opening.


Fold Lining A at R–S with right sides together and sew the dart.
In the same way, fold at T–U with right sides together and sew the dart.
Once done, sew the darts on the other Lining A piece as well.


Layer the two Lining A pieces with right sides together and sew them.
Leave the “stop-stitching point”※ unsewn — this is the opening for adding the stuffing later.


- 【 stop-stitching point 】
- Sew only up to the marked line.
Layer Lining A and B at X–V–X with right sides together and sew them.


Lay the chin’s N–O onto the N–O on the right side of Outer A (the side that comes to the right when worn) and baste it.
Lay the lining on top of that and sew N–O.


Layer the outer fabric and lining with right sides together and baste them.
At this point, make sure the chin is sandwiched between the outer and the lining.


Layer the outer fabric and lining with right sides together and sew E–J–C–O–N–X.
Sew the other side from E to X in the same way.


Fold the seam allowance at X inward, and sew X–G–Y–G–X.


First, trim the corners at N and O diagonally, and make a snip about 7 mm into the seam allowance at X.


There’s an “×” mark on both Outer A and Lining A of the pattern. Tie the two × marks together with hand-sewing thread so the lining doesn’t pop out.
Make the length of thread between the marks 4–5 cm.
Add the stuffing
Reach in through the lining opening and turn the whole thing right side out.


Add stuffing to the dinosaur’s eyes.
For clarity, we show stuffing them from the back. The stuffing goes in through the gap at the side of the eye lining.


Add stuffing until the whole hat feels firm.
If you stuff the middle too much, there won’t be room for your head, so avoid the middle and add stuffing around the sides.


Fold the seam allowance of the opening at the back of the head back by 1 cm and baste it.
Sew 5 mm from the fabric edge with the sewing machine to close the opening. You may also close it by hand with a ladder stitch※ or similar.


- 【 ladder stitch 】
- A stitch that keeps the seam from showing on either side of the fabric. A type of slip stitch used to close openings such as a turning gap.
Attach the eyes and nose to finish
The teeth are probably splaying outward, so fold them inward by hand.
Since they’re felt, the angle is easy to change.


Attach eyes made from felt, buttons, embroidery, or whatever you like.
The design and placement are up to you ☆
Your Dinosaur Plush Hat is now complete.
